¶ Important Safety Information
Read this manual completely before using the unit for the first time. Make sure you fully understand the intended use, limitations, controls, and safety precautions. Improper installation or use may result in electric shock, fire, equipment damage, or damage to workpieces.
 |
Read the manual before operating the unit. Follow the procedures in this manual when connecting power, loading workpieces, cleaning, and performing maintenance. |
 |
Dispose of electrical and electronic equipment in accordance with local regulations. |
¶ Before Use - Important Checks
• Install the unit on a level, sturdy workbench with minimal vibration.
• Do not use the unit in areas exposed to moisture, water splashes, corrosive gases, or flammable materials.
• Make sure the rated voltage and frequency shown on the product label match the local power supply.
• Do not block the cooling vents or fans. Provide sufficient clearance around the unit for heat dissipation.
• Check the polishing barrel and lid for damage. Do not use a barrel that is cracked, deformed, or leaking.
• Do not move the unit or remove the polishing barrel while the unit is operating.
• Before cleaning, inspection, fuse replacement, or other maintenance, turn off the power and unplug the power cord.
¶ Certification Information
 |
Company | Redt Inc. |
| Equipment | Magnetic Tumbler | |
| Model | MAGIC-MT110 MAGIC-MT135 MAGIC-MT180 |
|
 |
Company | Redt Inc. |
| Equipment | Magnetic Tumbler | |
| Model | MAGIC-MT110 MAGIC-MT135 MAGIC-MT180 |
¶ 1. Product Introduction
¶ 1.1 Product Overview
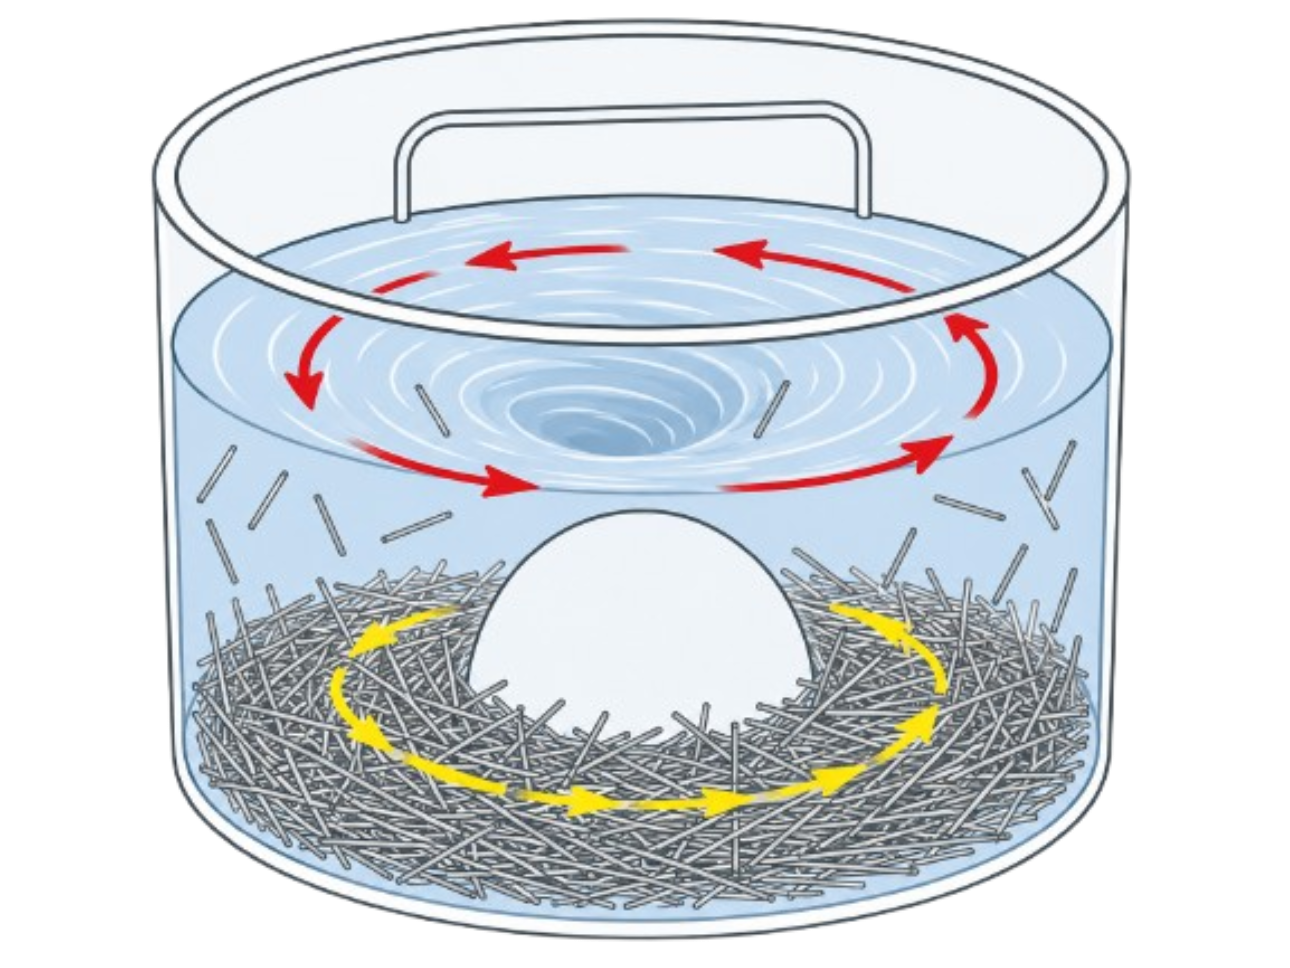
The MAGIC Magnetic Tumbler uses a powerful rotating magnetic field to rapidly move polishing pins for polishing, cleaning, and deburring jewelry and precision metal parts. The pins repeatedly contact not only external surfaces but also grooves, gaps, chain links, and other complex features, helping achieve a uniform finish even in areas that are difficult to reach by hand.
¶ 1.2 Main Applications
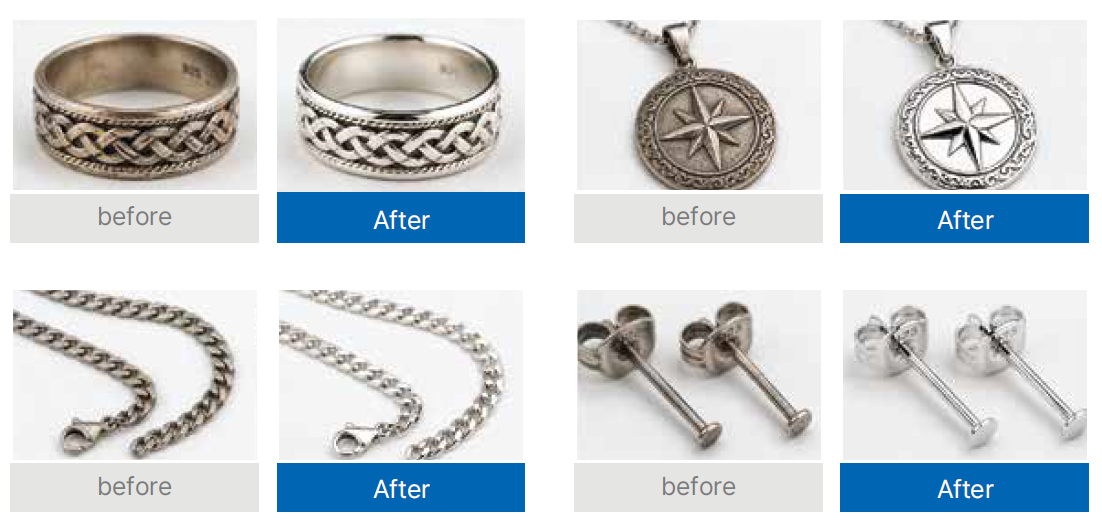
• Enhancing luster and final finishing of jewelry surfaces
• Removing fine burrs and refining surfaces after casting or machining
• Polishing intricate features on chains, rings, pendants, earrings, bracelets, and small parts
• Surface conditioning and a peening effect from repeated pin impacts
• Post-processing of workpieces made of gold, silver, platinum, stainless steel, brass, and other metals
¶ 1.3 Key Features
| Powerful Magnetic Drive | High-strength magnets and the motor rapidly drive the polishing pins to polish even complex shapes. |
| Stop&Go | Temporary stop-and-restart cycles during polishing reduce clustering of pins and workpieces and help redistribute them. |
| Speed Control | Adjusts the intensity of pin movement to suit the size, shape, and material of the workpiece. |
| Timer | Sets the polishing time. The machine automatically stops when the set time has elapsed. |
| Flow Disruptor Design | Raised structures on the bottom of the barrel disrupt uniform flow patterns, creating irregular movement of the polishing pins and workpieces for more effective polishing. |
| Batch Processing | Processes multiple small workpieces at once to improve productivity. |
¶ 1.4 Suitable Workpieces
Typical applications are listed below. Before actual processing, check the material, surface condition, plating, and stone settings, and perform a small test batch.
• Rings and ring components
• Chains, necklaces, and bracelets
• Pendants and earrings
• Cast parts and small metal components
• Complex parts with grooves, gaps, and recessed areas
¶ 2. Product Specifications and Included Items
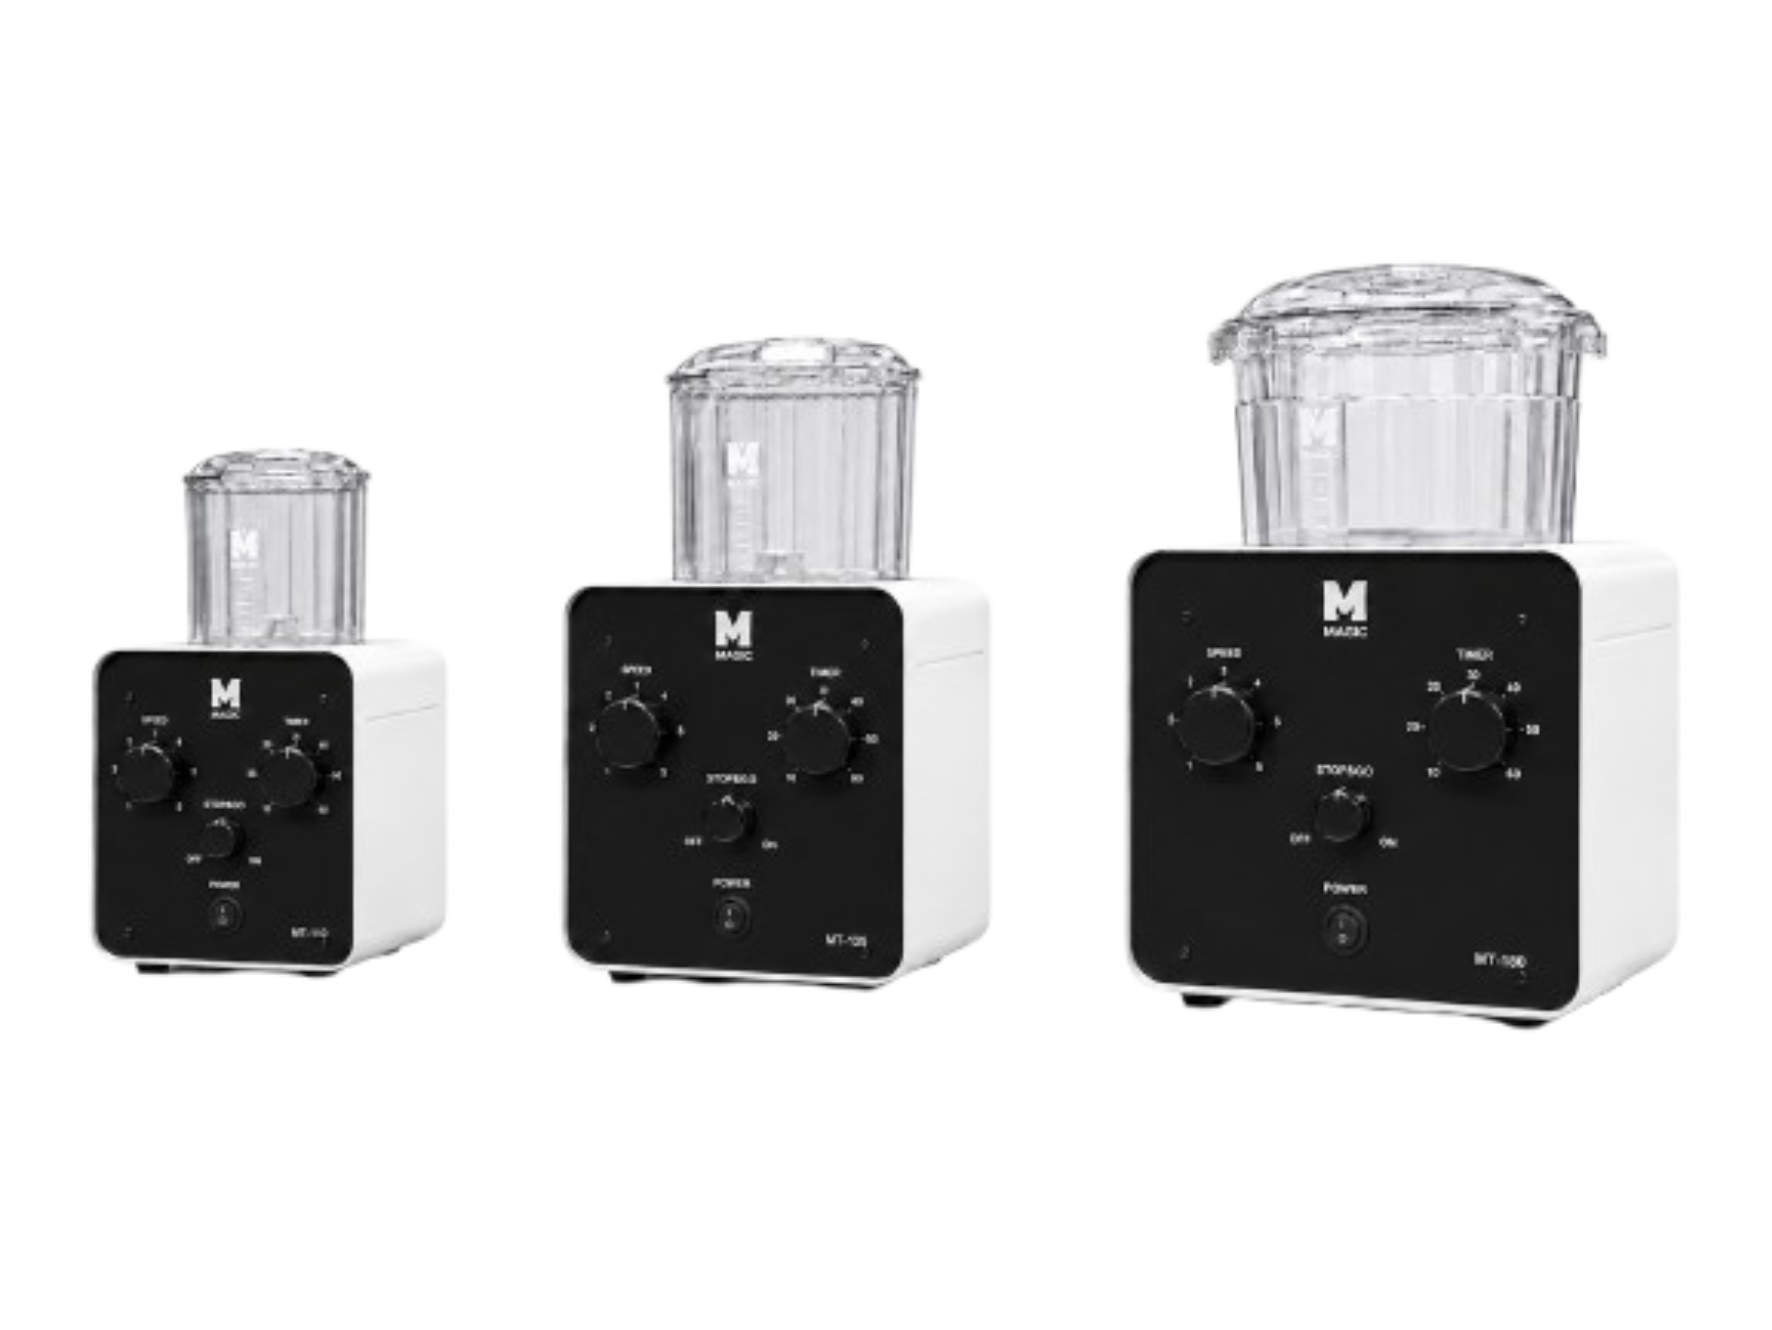
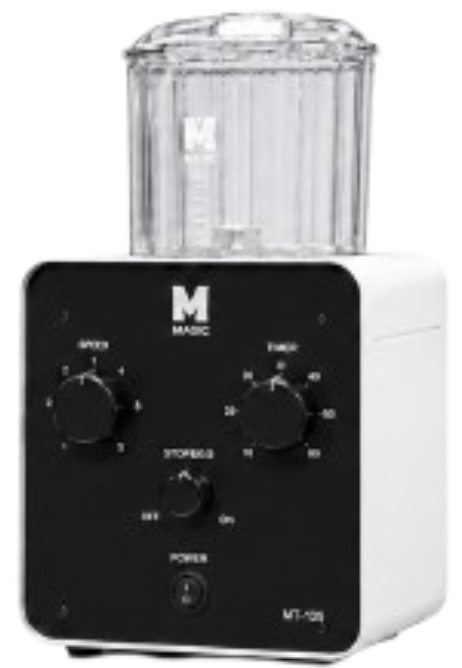
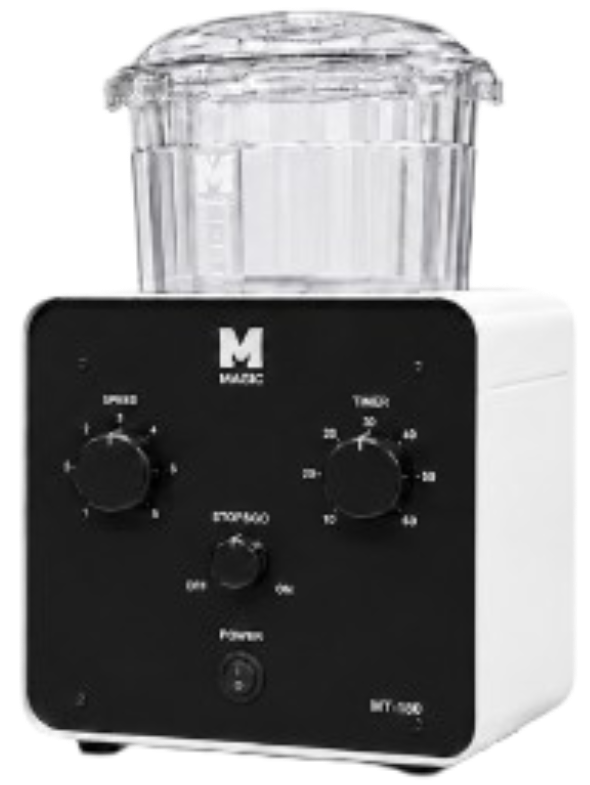
The MAGIC Magnetic Tumbler is available in three models with different polishing barrel sizes and power outputs. Because the barrel size and the amount of workpieces that can be polished in one batch vary by model, you can select the model best suited to your workload and operating environment.
¶ 2.1 Product Specifications
| Item | MT110 | MT135 | MT180 |
| Product Image |  |
 |
 |
| Product Name | Magnetic Tumbler | ||
| Timer | 0-60 min + Continuous | ||
| Speed | Control Supported | ||
| Stop&Go | Supported | ||
| Barrel Design | Flow Disruptor | ||
| Barrel Size | 110 mm x 100 mm | 135 mm x 100 mm | 180 mm x 100mm |
| Dimensions | 185 mm x 315 mm x 197 mm | 205 mm x 335 mm x 205 mm | 247 mm x 387 mm x 247 mm |
| Weight | 6Kg | 7Kg | 10Kg |
| Voltage / Frequency | 220VAC, 50/60Hz | ||
| Power | 70W | 110W | 250W |
¶ 2.2 Included Items
| Name | Image | Qty. | Purpose |
| Polishing Barrel | 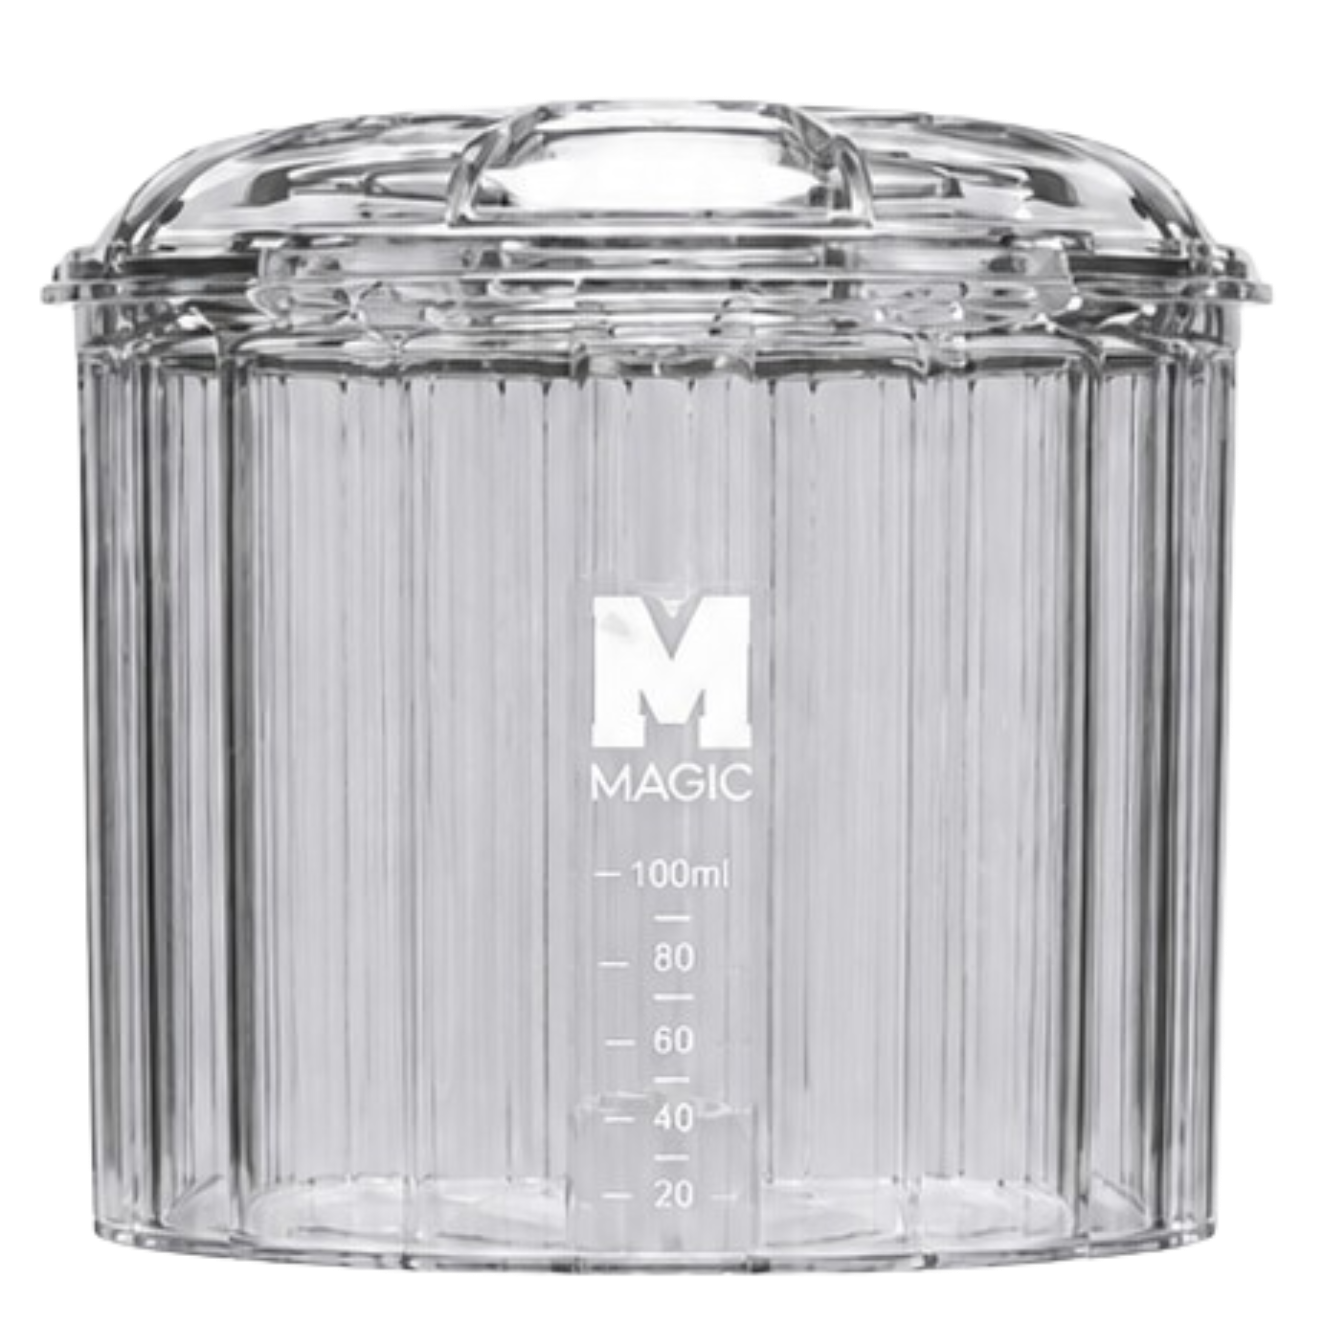 |
1 pc | Barrel used to hold polishing pins, water, polishing solution, and workpieces during polishing. |
| Polishing Pins | 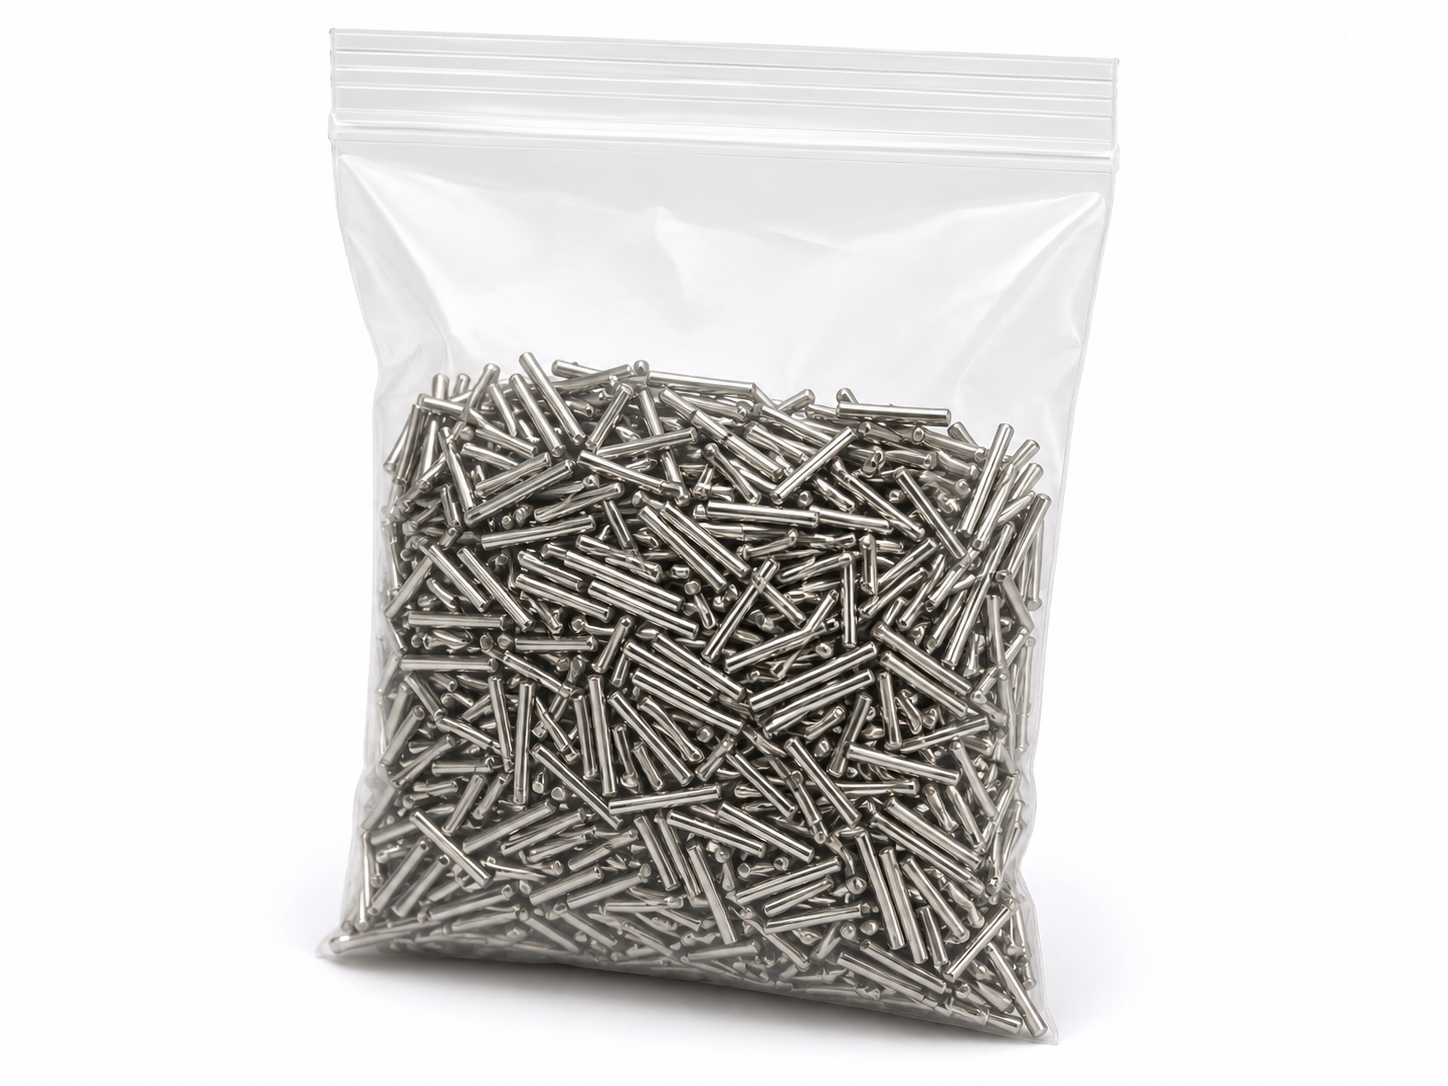 |
1 pc | Stainless steel pins rapidly driven by the rotating magnetic field to contact workpiece surfaces, grooves, and gaps for polishing, cleaning, and deburring. |
| Power Cord | 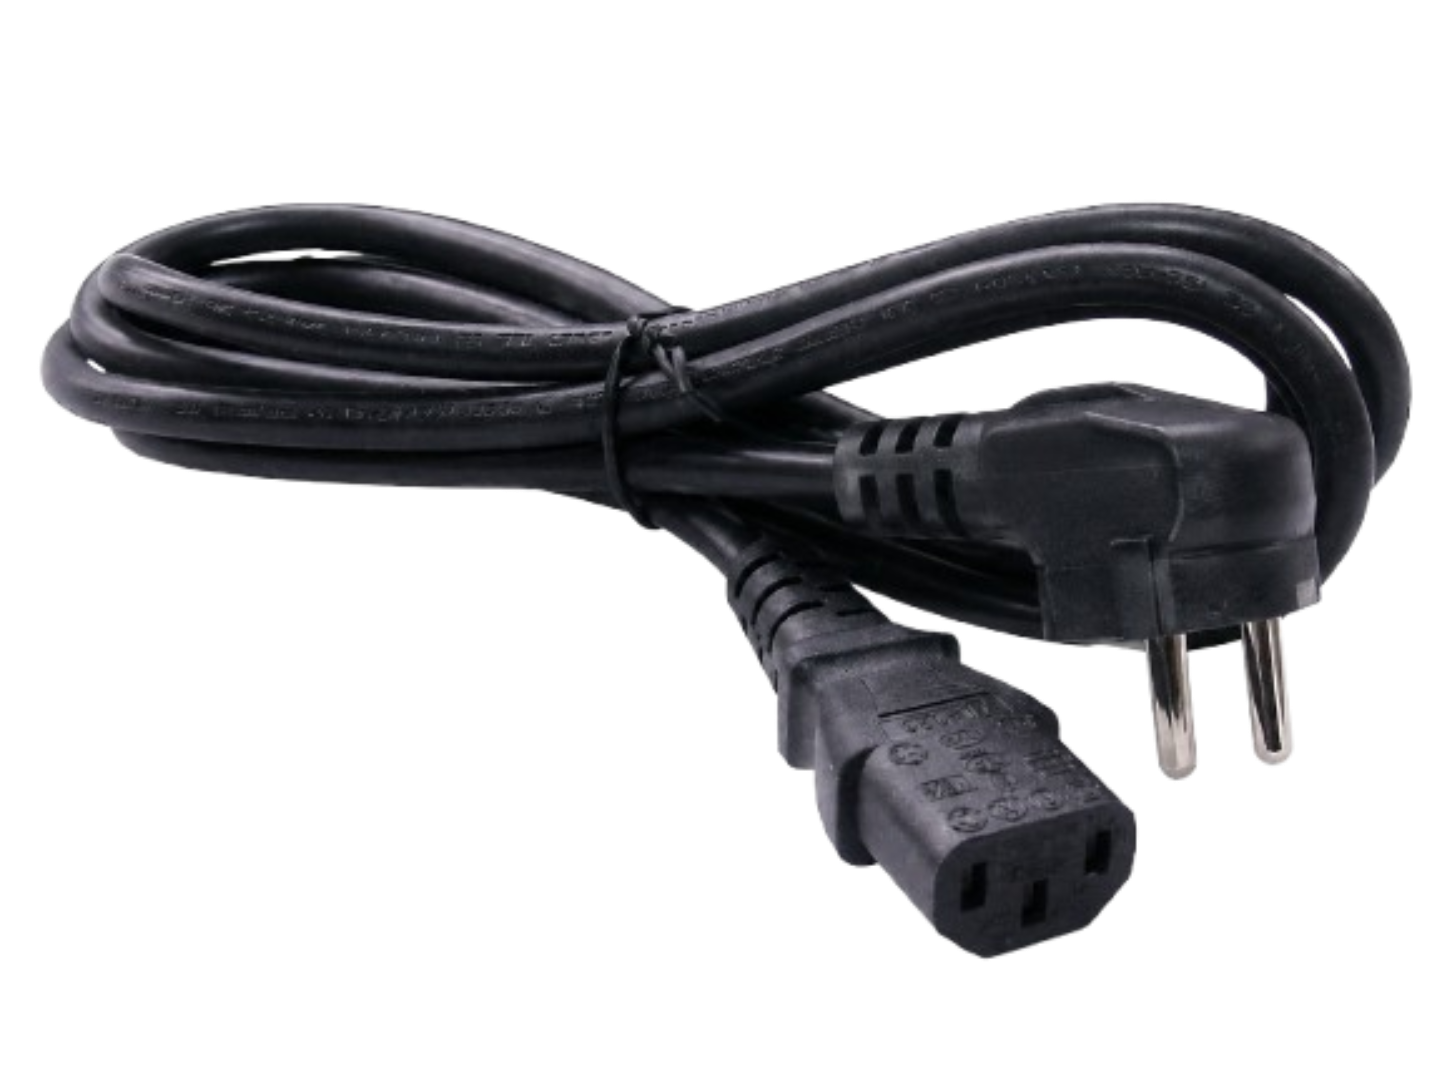 |
1 pc | Cord used to connect the unit to a power outlet and supply operating power. |
| Quick Start Guide |  |
1 pc | Guide for quickly checking product installation, basic operation, and key safety precautions. |
|
Barrel Diameter | MT110 | MT135 | MT180 |
| 110mm | 135mm | 180mm |
¶ 2.3 Consumables
| Name | Dimensions | Recommended Use |
Polishing Pins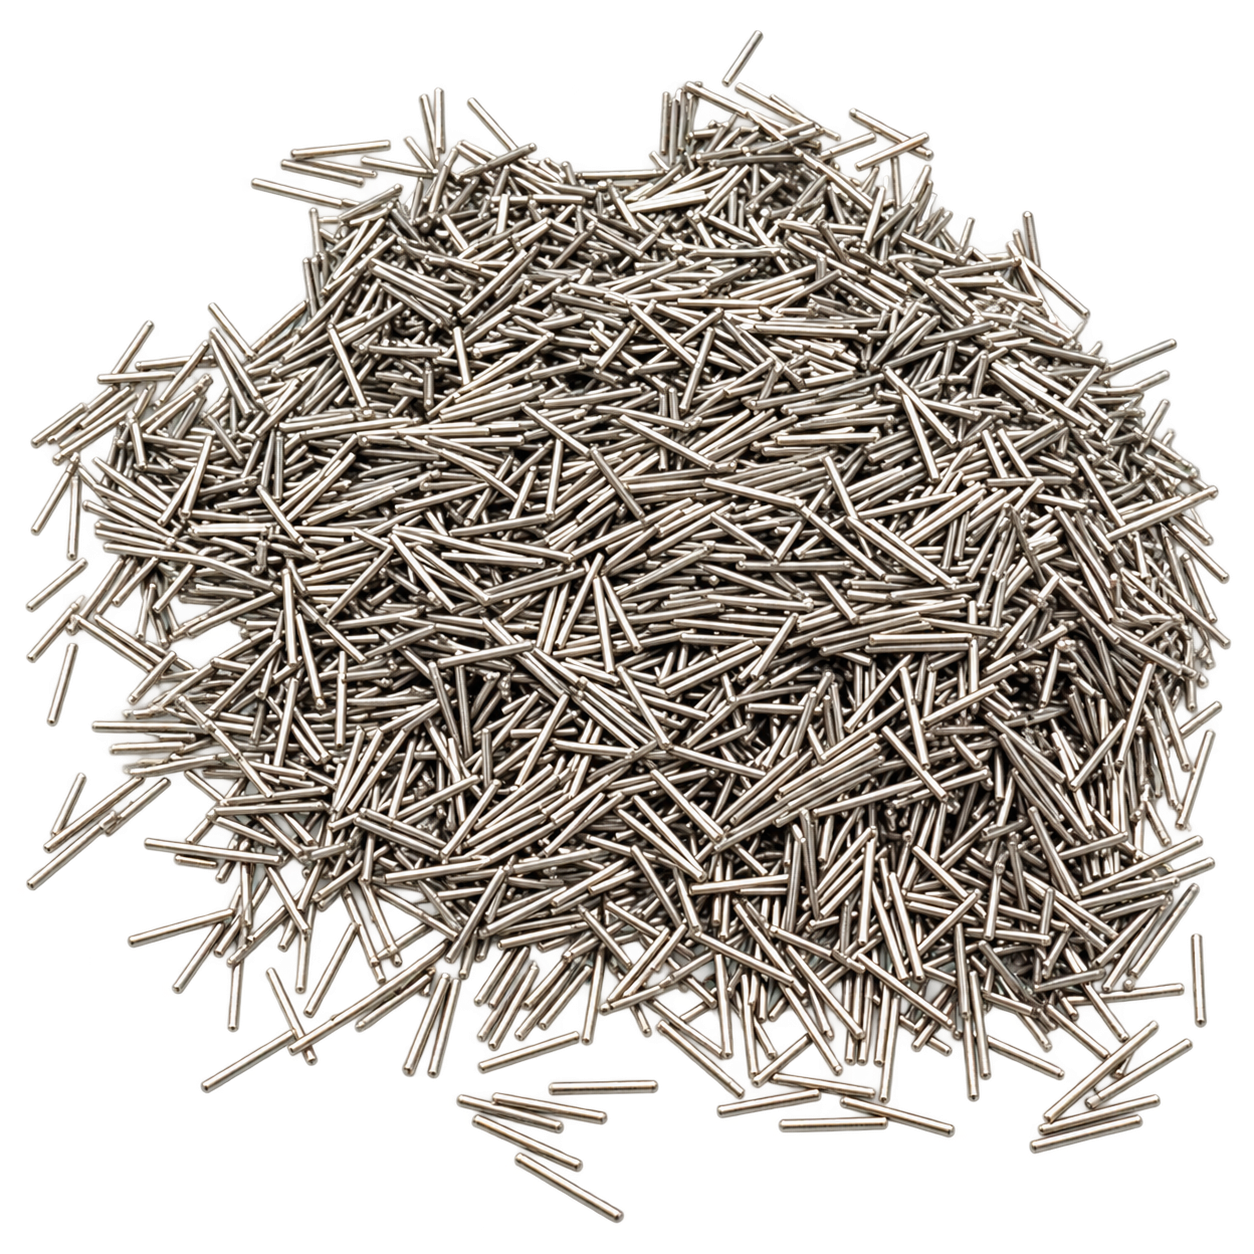 |
Ø0.3 mm x 5 mm | Suitable for precise and gentle polishing of fine chains, narrow gaps and grooves, and delicate jewelry pieces. |
| Ø0.5 mm x 5 mm | Suitable for general-purpose polishing of common jewelry items such as rings, pendants, and chains. | |
| Ø0.8 mm x 5 mm | Suitable for more aggressive polishing of relatively large and durable workpieces or parts requiring stronger polishing action. |
¶ 3. Product Components and Part Names
¶ 3.1 Front Components
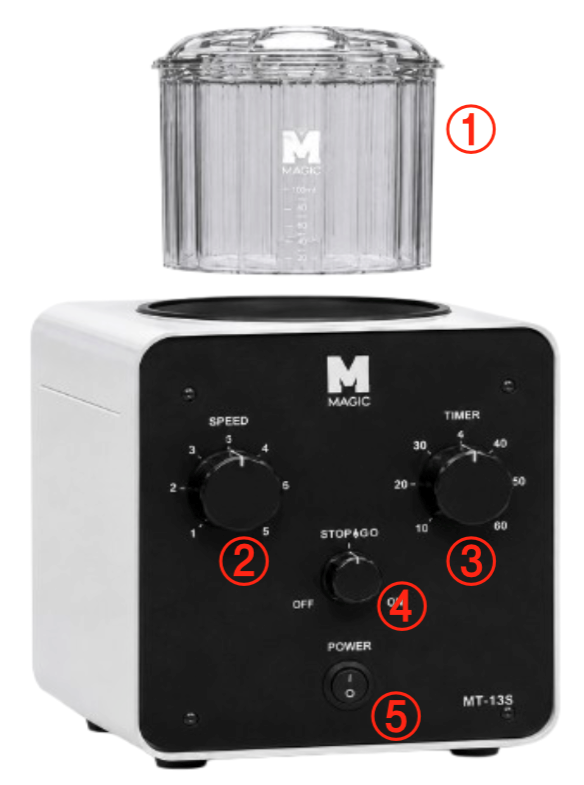
| No. | Name | Description |
| 1 | Polishing Barrel | Holds the polishing pins, water, polishing solution, and workpieces during polishing. |
| 2 | Speed Control Knob | Adjusts motor speed to set the polishing intensity. |
| 3 | Timer Knob | Sets the polishing operating time. |
| 4 | Stop&Go Control Knob | Sets the Stop&Go operation. |
| 5 | Power Switch | Turns the unit power on or off. |
¶ 3.2 Rear Components
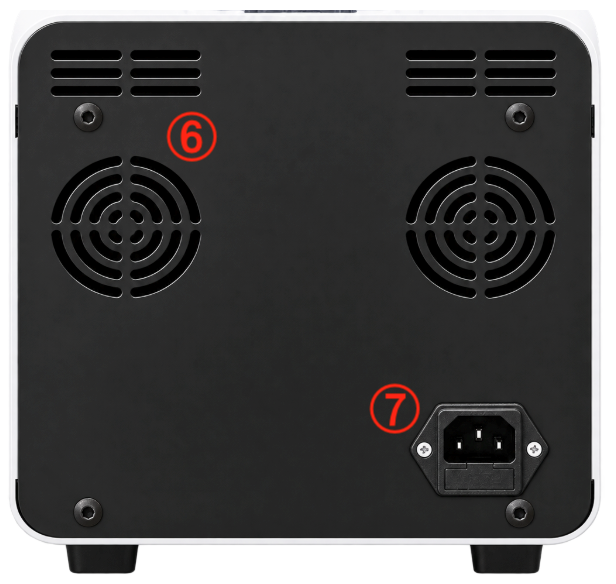
| No. | Name | Description |
| 6 | Cooling Vent | Releases heat generated inside the unit. Do not block the vent during operation. |
| 7 | AC Power Inlet & Fuse | Connects the power cord and incorporates a fuse that protects the unit from overcurrent. |
¶ 4. Installation and Pre-Operation Preparation
¶ 4.1 Installation Location
• Install the unit on a level, sturdy workbench capable of supporting its weight.
• Provide sufficient clearance around the unit, especially around the cooling vents, to allow heat to dissipate freely.
• Avoid direct sunlight, high temperature or humidity, dusty areas, and locations where water may splash.
• Do not use the unit near flammable liquids or gases or highly corrosive substances.
• Choose a stable location where vibration from the unit will not affect nearby precision equipment.
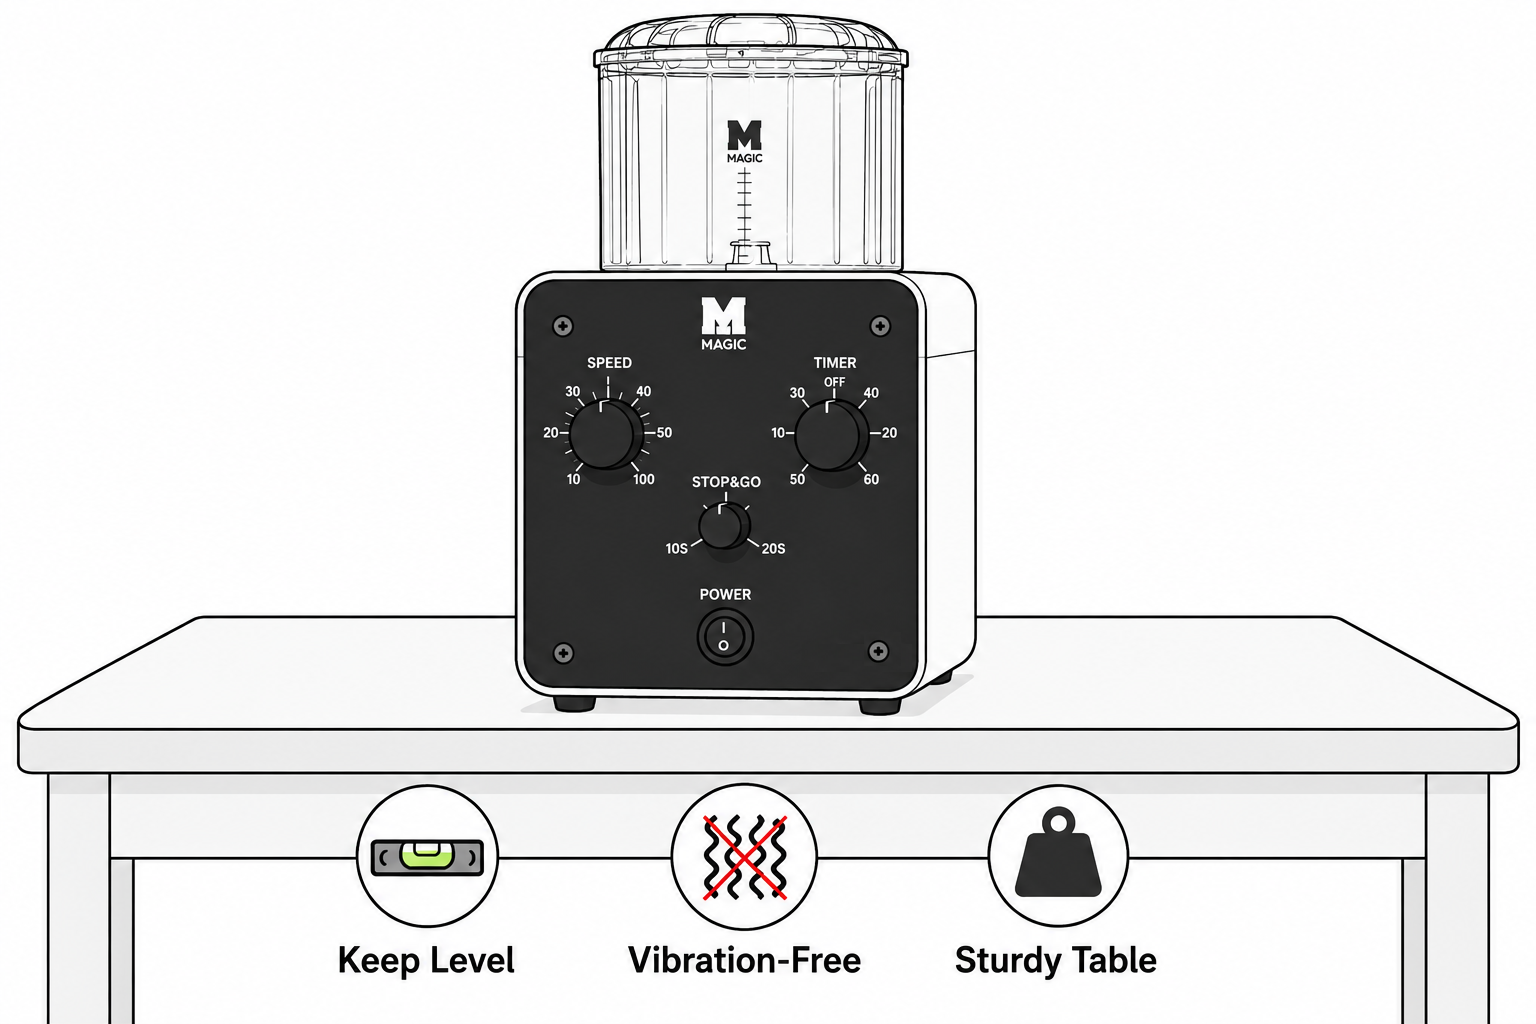
This machine contains powerful magnets. Keep pacemakers and other magnetically sensitive medical devices, electronic devices, and magnetic cards away from the machine.
¶ 4.2 Power Connection
- Make sure the power switch is set to OFF.
- Check the rated voltage and frequency on the product label and make sure they match the local power supply.
- Connect the power cord to a properly grounded outlet.
- Route the power cord so that it is not pinched or in contact with sharp edges.
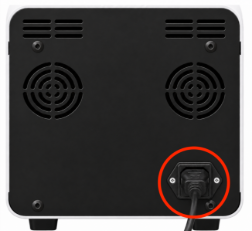
If an extension cord must be used, use one rated to safely handle the unit’s power consumption. Do not use damaged plugs or outlets, or connections that are loose or intermittent.
• Check the polishing barrel for cracks, deformation, leaks, or severe scratches.
• Check that the polishing pins are not excessively contaminated with rust, foreign matter, or metal dust.
• Use a polishing solution that is compatible with the unit and the material of the polishing barrel.
• Do not use strong acids, strong alkalis, solvents, or other corrosive liquids, as they may crack or degrade the polishing barrel.
¶ 5. Controls and Functions
¶ 5.1 Front Controls
| Control | Function |
| Speed Control | Adjusts pin movement and polishing intensity. For light workpieces, start at a low speed and increase gradually as needed. |
| Timer | Sets the operating time from 0 to 60 minutes. Turning the knob left from the OFF position selects continuous operation. During extended continuous operation, the unit and polishing barrel may become warm; periodically check the condition and temperature of the unit. |
| Stop&Go | Temporarily interrupts and restarts operation to redistribute the pins and workpieces, helping reduce clustering of complex parts or chains. The interval can be adjusted from 20 to 50 seconds using the control knob.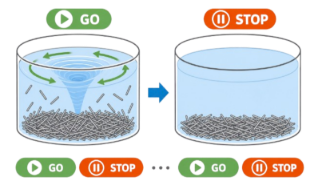 |
| Power Switch | Turns the main power on or off. Keep the switch in the OFF position while setting polishing conditions. |
¶ 5.2 Rear Cooling and Power Section
| Control | Image | Function |
| Cooling Vent | 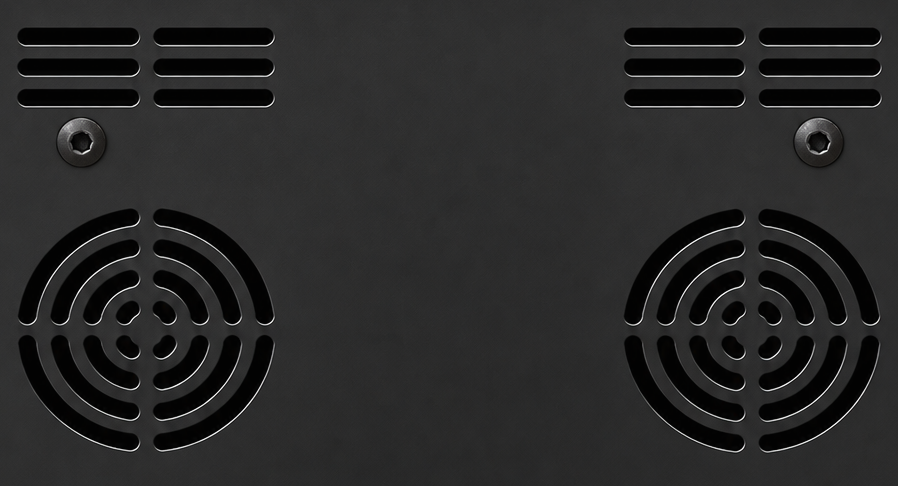 |
Releases internal heat during extended operation. Do not block the vent, and remove dust regularly. |
| Fuse | 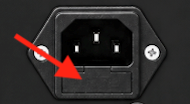 |
If the unit does not power on, check the fuse as well as the power supply. Always use the specified fuse rating. |
| AC Power Inlet | 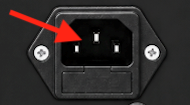 |
Connect the power cord here. Make sure the connector is fully inserted. |
¶ 5.3 Fuse Replacement
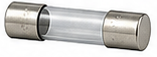
If the unit does not power on even though the power supply is normal, check the fuse.
 |
MT110 | MT135 | MT180 | |
| Fuse Rating | AC220V / 5A | AC220V / 8A | AC220V / 10A |
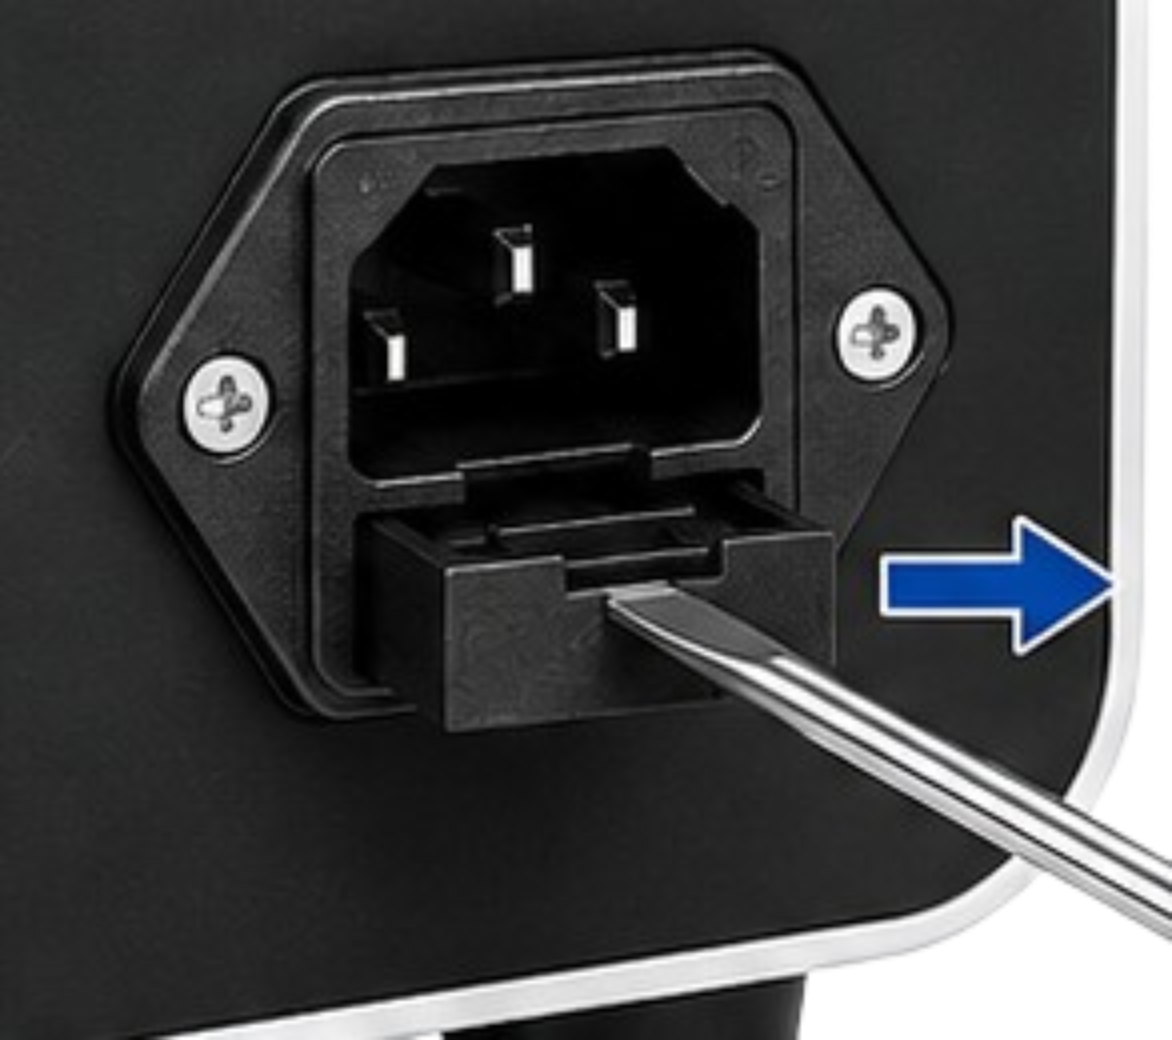
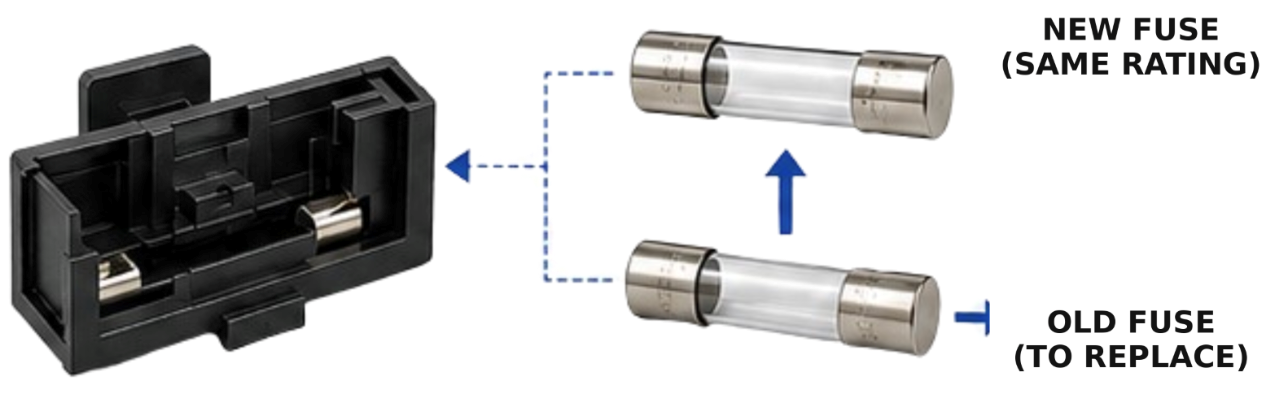
Check and replace the fuse as follows.
 |
 |
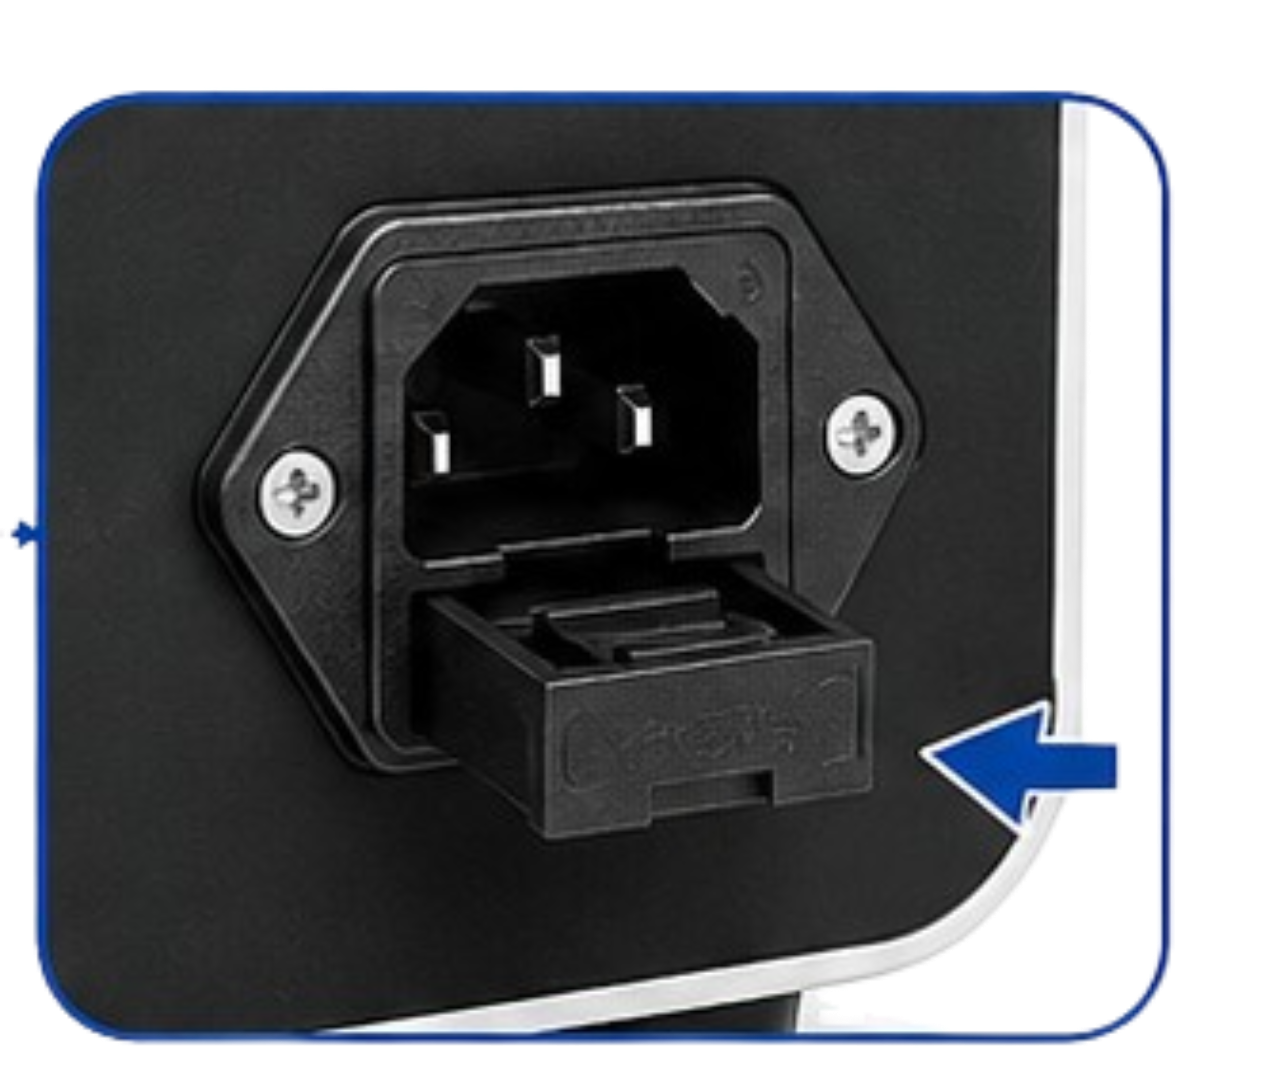 |
| 1. Insert a flat-blade screwdriver into the fuse-holder slot and gently pry the fuse holder out. | 2. Remove the existing fuse from the holder and insert a new fuse with the same rating. | 3. Push the fuse holder fully into the power inlet and make sure it is securely seated. |
¶ 6. Basic Operating Instructions
¶ 6.1 Items Required for Polishing
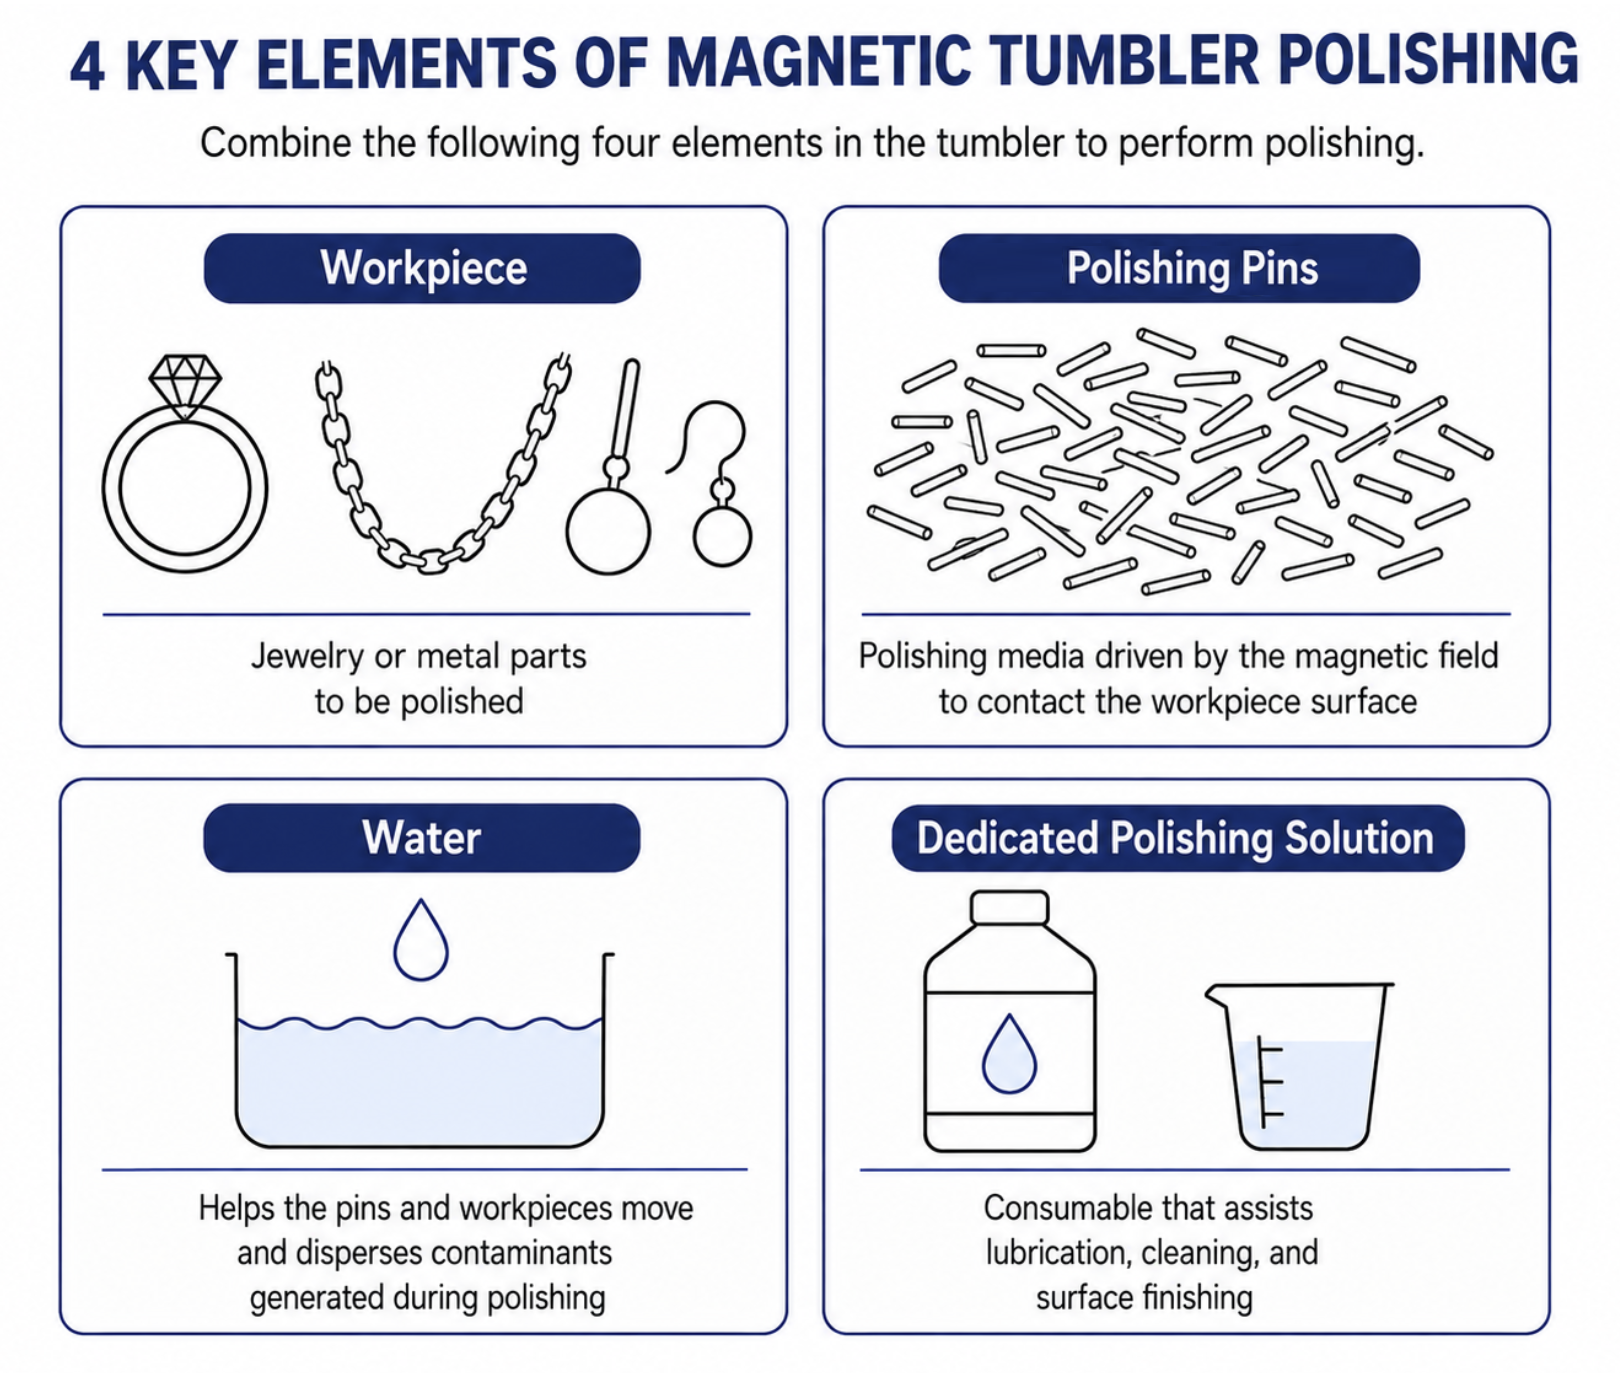
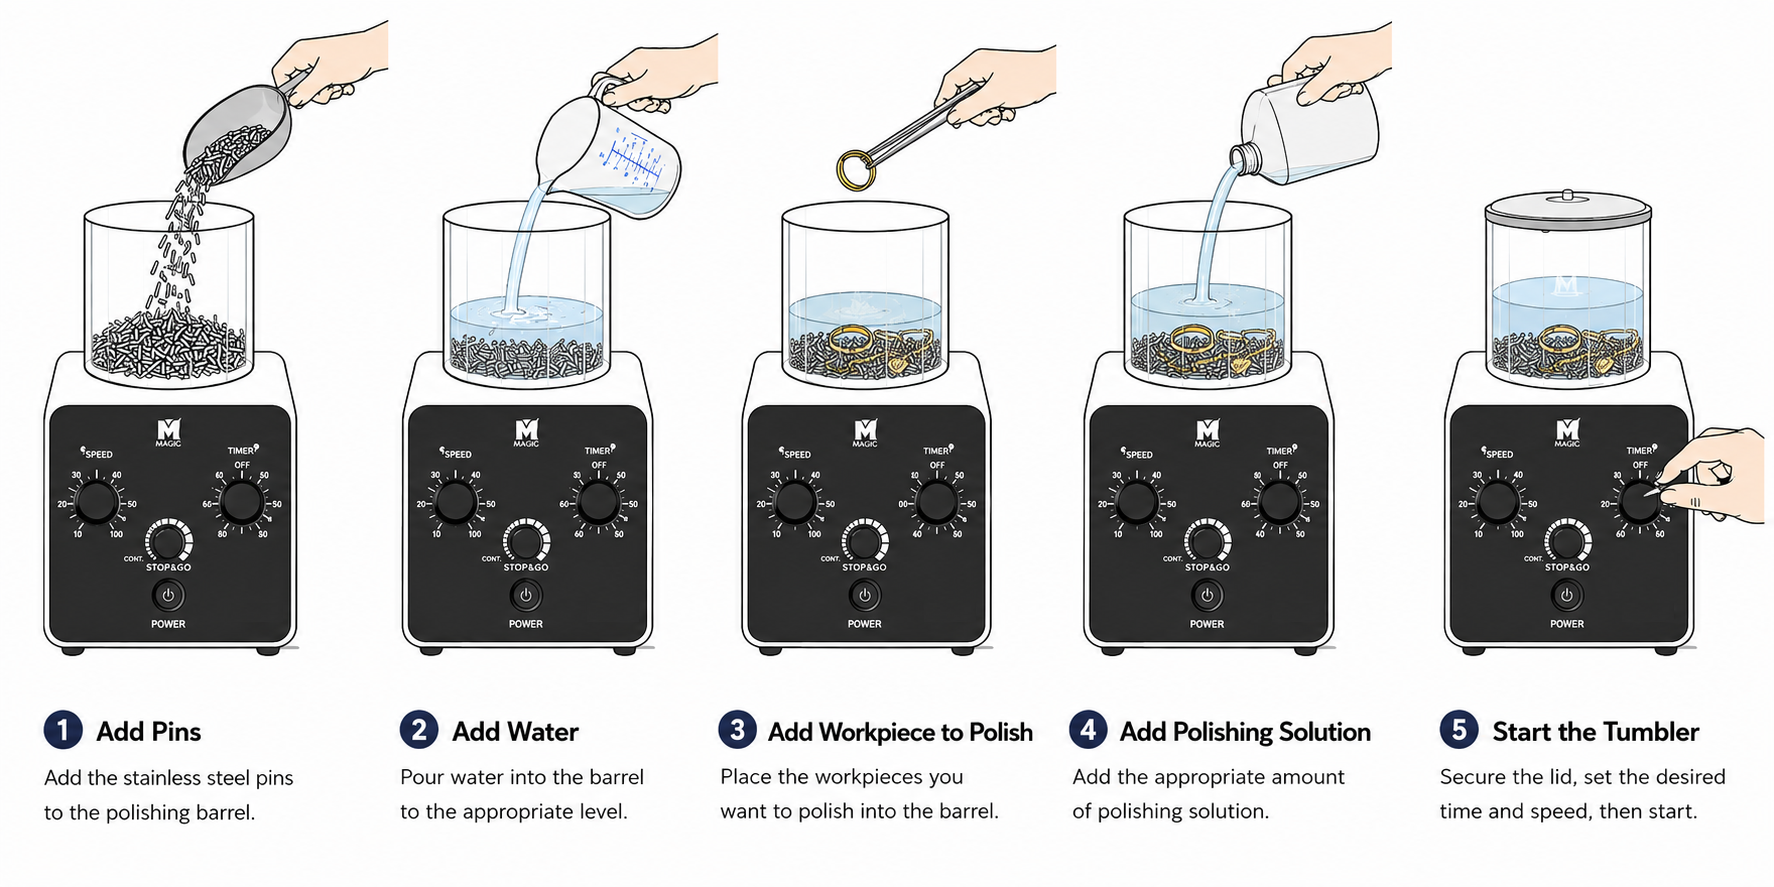
Magnetic tumble polishing is generally performed by placing the following 4 items (Workpiece, Polishing Pins, Water, Dedicated Polishing Solution) together in the polishing barrel.
¶ 6.2 Pre-Inspection of Workpieces
• For stone-set jewelry, make sure the prongs and stones are secure before polishing.
• Chains and very thin parts may tangle or deform, so test with a small quantity first.
• For plated items, start with low polishing intensity and a short operating time, and check for wear of the plating layer.
• Removing heavy contamination such as oil, wax, or polishing residue beforehand helps reduce contamination of the polishing solution.
¶ 6.3 Operating Procedure
- Make sure the unit is installed on a level, stable surface.
- Add the required amount of polishing pins to the polishing barrel.
- Add the workpieces and arrange them so they do not excessively overlap or clump together.
- Add water and the dedicated polishing solution according to the recommended amount for your model.
- Close the lid and install the polishing barrel centered on the unit.
- Turn on the power and set the timer and speed. Start at a low speed.
- At the start of operation, make sure the pins and workpieces circulate smoothly and that there is no abnormal noise, vibration, or leakage.
- When polishing is complete, wait until the unit has fully stopped, then take out the workpieces, rinse them, and dry them.
¶ 6.4 Recommended Operating Time
Jewelry polishing can generally achieve satisfactory results in about 10-30 minutes, but the required time varies depending on the workpiece material and surface condition, pin size and quantity, polishing solution, and speed. Start with a short test cycle and extend the time as needed.
• Always start with conservative settings. After confirming that the workpieces move smoothly, adjust the pin quantity, water, speed, and operating time. Overloading may reduce polishing efficiency and cause abnormal vibration, motor overload, or barrel damage.
• For repeated production of the same item, record the number of workpieces, pin weight, water/polishing-solution amount, speed, time, and results. Managing these as standard conditions helps reduce variation between batches.
¶ 6.5 Finishing the Operation
• After the timer ends or the power is switched OFF, wait until the unit comes to a complete stop.
• Take out the workpieces.
• Rinse the workpieces thoroughly with clean water and dry them.
When Installing the Polishing Barrel
A polishing barrel containing polishing pins may be suddenly pulled toward the unit by the magnets. The resulting impact may damage the barrel. Hold the barrel securely with both hands and slowly lower one side first, then carefully lower the rest of the barrel to avoid impact.
When Removing the Polishing Barrel
The strong magnetic force may make the polishing barrel difficult to remove. Hold the barrel securely with both hands and slowly lift one side until it clears the magnetic attraction, then remove it carefully. This method helps prevent water from spilling.
When Water Overflows
Immediately wipe away any water that overflows from the polishing barrel. Do not allow liquid to collect around the unit, as it may enter the unit and cause electrical leakage, corrosion, or electric shock.
¶ 7. Operating Guide for Efficient Polishing
• If polishing is uneven, check the load amount and pin flow before simply increasing the speed.
• If chains tangle with one another, reduce the quantity processed at one time or test at a lower speed.
• If pin movement is sluggish, check for overloading, the amount of water, and pin contamination.
¶ 7.1 Speed Adjustment
| Condition | Recommended Starting Point | Check |
| Thin, lightweight parts | Low speed | Check for deformation, tangling, or excessive impact |
| General jewelry | Start at medium speed | Check pin flow and surface finish |
| Complex grooves and gaps | Medium speed + sufficient circulation | Check pin access and clustering |
| Parts requiring heavy deburring | Increase speed gradually | Check for over-polishing or edge damage |
¶ 7.2 Stop&Go Operation
During polishing, the pins and workpieces form a consistent flow pattern inside the barrel. When many chains or complex-shaped parts are present, they may gather at one point or the flow pattern may become fixed. The Stop&Go function periodically interrupts and changes this flow, helping redistribute the pins and workpieces.
¶ 7.3 Adjustment Sequence When Results Are Unsatisfactory
- Check the total amount of workpieces and pins
- Check the amount of water and polishing solution
- Check pin cleanliness and wear
- Adjust the speed
- Adjust the operating time
¶ 8. Safety Precautions
¶ 8.1 Electrical Safety
• Immediately wipe away any water that overflows from the polishing barrel. Do not allow liquid to collect around the unit, as it may enter the unit and cause electrical leakage, corrosion, or electric shock.
• Do not touch the power plug or switch with wet hands.
• Use a properly grounded power source.
• Stop using the unit and replace the power cord if the cord is damaged or the plug is loose.
• Do not bypass the fuse or replace it with a fuse of a different rating.
¶ 8.2 Safety During Operation
• Do not disassemble or move the polishing barrel, lid, or unit while the unit is operating.
• Even after the unit stops, make sure all internal rotating parts have come to a complete stop before removing the barrel, cleaning, or inspecting the unit.
• Immediately turn off the power if abnormal impact noise, severe vibration, a burning smell, smoke, or leakage occurs.
• Do not allow children or untrained persons to operate the unit.
• Do not place tools, metal objects, or containers of liquid on top of the unit.
¶ 8.3 Polishing Solution and Barrel
• Do not use corrosive liquids, flammable solvents, or other chemicals that may damage the unit or polishing barrel.
• Do not fill the barrel with water above the permitted level.
• Do not use the barrel if the lid does not close properly or if the barrel is cracked.
¶ 8.4 Strong Magnet Precautions
• This machine contains powerful magnets and may generate a strong magnetic field around the unit.
• Persons with pacemakers or other medical devices that may be affected by magnetic fields should not approach the machine.
• Keep mechanical or magnetic watches, magnetic cards, magnetic storage media, precision electronic devices, and other magnetically sensitive items at a safe distance from the machine. Strong magnetic fields may cause malfunction, damage, or data loss to such devices or items.
¶ 9. Maintenance
If the used polishing solution is contaminated or will not be reused, drain it and, as necessary, rinse the polishing barrel and pins with clean water.
¶ 9.1 Routine Inspection
| Inspection Item | Typical Frequency | What to Check |
| Polishing Barrel | Before each operation | Cracks, leaks, deformation, lid condition |
| Polishing Pins | Before each operation | Contamination, rust, clumping, foreign matter |
| Fuse | If a problem occurs | Check whether the fuse is blown and verify the specified rating |
¶ 9.2 Polishing Pin Care
• Keep the pins clean. Contaminated pins can reduce polishing performance and leave stains on workpieces.
• For long-term storage after cleaning, dry the pins thoroughly and store them where they will not be contaminated by foreign matter.
• Consider replacing the pins if their size or shape becomes excessively deformed or if contamination cannot be removed.
¶ 10. Troubleshooting
| Symptom | Possible Cause | Check / Corrective Action |
| Unit does not power on | Power cord not connected, faulty outlet, blown fuse | Check the power connection and outlet. If necessary, inspect the fuse and use only the specified rating. |
| Severe vibration during operation | Barrel not seated correctly, overload, uneven workpiece distribution | Stop the unit immediately. Check that the barrel is correctly installed and that the load is appropriate, then redistribute the workpieces evenly. |
| Poor polishing performance | Speed too low, insufficient or contaminated pins, overload, insufficient operating time | First check the load amount and pin condition, then adjust speed and operating time gradually. |
| Pins/workpieces clump together | Too many chains, fixed flow pattern, inappropriate speed | Reduce the quantity processed at one time and use the Stop&Go function. |
| Unit becomes hot | Blocked cooling vents, extended continuous operation, overload | Clean the cooling vents, stop the unit and allow it to cool, then reduce the load and try again. |
| Liquid leaks from the barrel | Too much water or polishing solution, lid not fully closed, cracked or deformed barrel | Stop using the unit immediately and check the liquid level and lid closure. If too much liquid has been added, reduce it to an appropriate level. Replace the barrel if it is cracked or deformed. |
| Fuse blows repeatedly | Possible electrical fault or overload | Identify the cause and contact service personnel before replacing the fuse again with one of the same rating. |
If you experience repeated power-related faults, a burning smell, internal sparking, motor stoppage, excessive noise, or suspected moisture intrusion, do not attempt to disassemble or repair the unit yourself. Contact the Redt Inc. service center or your local reseller for assistance.
¶ 11. Storage, Transportation, and Disposal
¶ 11.1 Storage
• If the unit will not be used for an extended period, clean and dry the polishing barrel and pins before storage.
• Store the unit indoors, away from moisture, direct sunlight, and corrosive gases.
• Store the power cord so that it is not sharply bent or pinched under the unit.
• Keep the unit clean to prevent dust from entering the cooling vents.
¶ 11.2 Transportation
• Turn off the power and unplug the power cord.
• Remove all workpieces, pins, water, and polishing solution from the polishing barrel.
• Allow the unit to cool sufficiently, then move it while holding a stable part of the housing.
• For transportation, secure and pack the polishing barrel and main unit separately to protect them from impact.
¶ 11.3 Disposal
This product contains electrical and electronic components, magnets, metal, and plastic parts. Dispose of it in accordance with local regulations for electrical and electronic equipment, or use an authorized collection or recycling facility.
¶ Warranty Coverage and Service
Limited Product Warranty
Product Name: Magnetic Tumbler
Model Name: MAGIC-MT110, MAGIC- MT135, MAGIC- MT180
This product is covered by a limited warranty subject to the terms and conditions set forth below.
1. Equipment Covered by the Warranty: MAGIC-MT110, MAGIC- MT135, MAGIC- MT180
2. Warranty Period: 12 months from the date of purchase. If the purchase date cannot be verified, the warranty period is 13 months from the date of manufacture.
3. Warranty Exclusions
This warranty does not cover:
- Damage or malfunction caused by natural disasters, including fire, salt corrosion, gas-related incidents,
earthquakes, floods, or other force majeure events. - Replacement of consumable parts subject to normal wear and tear.
- Damage or malfunction caused by abnormalities in the power supply, defects in connected devices, improper grounding, overvoltage, power surges, or unstable power supply.
- Damage or malfunction caused by external factors rather than defects in the product itself.
- Damage caused by improper installation, transportation, or storage.
- Products with serial numbers that have been removed, altered, defaced, or rendered illegible.
- Unauthorized disassembly, repair, modification, or alteration.
- Damage or malfunction resulting from repair, modification, or alteration performed by persons other than
Redt Inc. or its authorized service personnel. - Damage or malfunction caused by the customer's intentional misuse, negligence, or improper operation.
- Third-party products, accessories, or components are subject to the warranty policies of their respective
manufacturers.
4. Warranty Coverage
Subject to the terms and exclusions of this warranty, Redt Inc. will provide warranty service for malfunctions that occur during the applicable warranty period under normal and intended use and are confirmed upon inspection to have resulted from defects in the product’s materials, manufacturing, or assembly.
Warranty service is limited to the repair, adjustment, or replacement of defective parts and shall be provided in accordance with Section 5.
5. Warranty Service Procedures and Shipping Costs
- When requesting warranty service, customers may be instructed by Redt Inc. or an authorized Redt dealer to perform product inspection, adjustment, replacement of parts, or simple corrective actions, as reasonably required to diagnose or resolve the issue.
- If the issue cannot be resolved through such measures, the customer shall, in accordance with the instructions provided, send the product to Redt Inc., an authorized Redt dealer, or a designated authorized service provider for further inspection or service.
- Unless otherwise required by applicable law, the customer is generally responsible for the shipping costs associated with sending the product to Redt Inc., an authorized dealer, or an authorized service provider, including during the warranty period. Redt Inc. or the applicable authorized dealer shall bear the cost of return shipping for products repaired under warranty.
- Redt Inc. or the applicable authorized dealer shall bear the cost of replacement parts covered under warranty and the standard shipping costs associated with delivering such parts. If the return of defective parts is required, the applicable procedures and allocation of shipping costs will be communicated separately.
- If the warranty period has expired, if inspection determines that no defect exists, or if the issue is not covered under this warranty, the customer shall be responsible for all costs associated with inspection, repair, and shipping.
- Nothing in this section limits or excludes any consumer rights that cannot be limited or excluded under the applicable laws of the country or region where the product was sold. Where applicable law provides otherwise, such law shall prevail.
6. Warranty Remedies and Limitation of Liability
For valid warranty claims, Redt.Inc or its authorized distributor in the applicable country may determine, at its reasonable discretion, the appropriate remedy based on the condition of the product and the nature of the defect.
Such remedies may include:
• Repair
• Replacement of defective parts
• Product replacement
• Other appropriate corrective actions
To the maximum extent permitted by applicable law, Redt.Inc shall not be liable for any indirect, incidental, consequential, special, punitive, or business-related losses arising from the use of the product.
Products submitted for service outside the applicable warranty period shall be repaired at the customer's expense.
On-site service may be available for an additional charge. Availability, fees, and service conditions may vary by country or region.
7. International Sales and Distribution
This warranty applies only to products purchased directly from Redt.Inc or through Redt.Inc's authorized distributors or resellers.
Redt.Inc assumes no responsibility for products exported, resold, or distributed internationally without authorization from Redt Inc.
8. Consumer Rights
Nothing in this warranty limits or excludes any consumer rights that cannot be limited or excluded under applicable law.
Matters not expressly covered by this warranty shall be governed by the applicable consumer protection laws and regulations of the country or region where the product is sold.
9. Policy Change Provision
Redt.Inc reserves the right to modify or update this warranty policy from time to time.
Any revised warranty policy shall apply only to products sold on or after the effective date of the revision and shall not reduce, restrict, or otherwise adversely affect warranty coverage already granted for products sold prior to that date.
10. Conditions of Warranty Validity
This warranty is valid only when the product is installed, operated, maintained, and used in accordance with the instructions, specifications, and operating conditions provided by Redt Inc.