※ Rotary image scan is used for marking irregularly shaped rings and is optional.
※ Before scanning, make sure the laser focus is precisely aligned with the ring surface. If the focus is incorrect, the accuracy of the scan and marking position may be significantly reduced.
※ For inner diameter scanning, adjust the rotary angle first, then set the laser focus.
※ Enter the ring diameter and width accurately. These values affect the accuracy of the scan results and marking position.
What is rotary image scan?
The rotary image scan feature captures images of the ring's inner or outer surface while the ring is mounted on the rotary and displays the scanned surface as an unwrapped image on the engraving workspace.
While it is easy to align a standard circular ring, it can be difficult to visually determine the exact engraving position on the inside or outside of irregularly shaped or curved rings. Using the ring scan function, the camera captures the surface at various angles as the rotary rotates the ring, generating an image that reflects the ring's actual shape.
The generated scan image is displayed in the workspace, allowing the user to place text or artwork at the desired position based on the scanned image. This is especially useful for applications such as inner-ring engraving, where alignment is difficult, because the actual ring shape can be viewed while positioning the design, improving both convenience and marking accuracy.
Additionally, the system automatically adjusts the focus height and rotary tilt angle during scanning, helping ensure stable scan results and engraving preparation.
Tap the [Refresh] button in the camera area to open the [Rotary Image Scan] window.
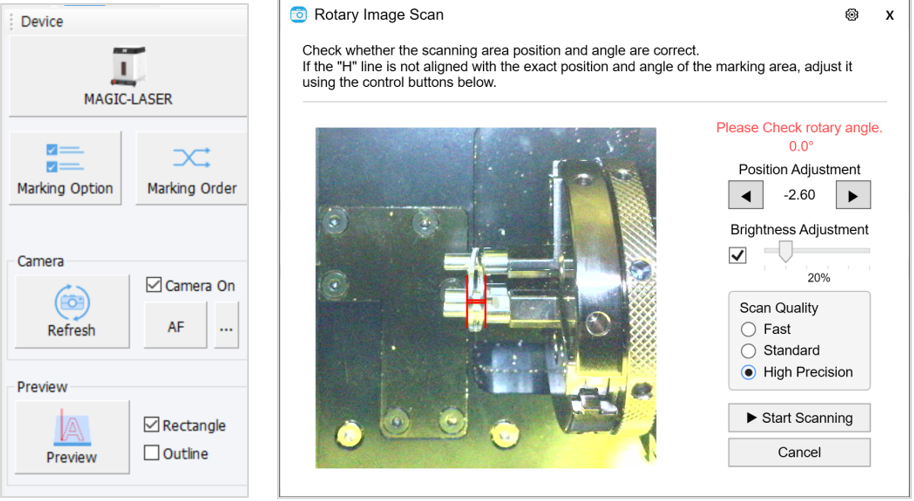
① Adjust the rotary angle to the value displayed in the program.
② Verify that the laser focus is aligned with the ring surface.
③ Tap the [Position Adjustment◀▶] button to move the "H" displayed on the screen to the desired scan position.
④ If the image is not detected properly, adjust the brightness of the internal LED and pointer.
⑤ Select the scan quality. Scan time increases as the setting changes from [Fast] to [High Precision].
⑥ Tap the [▶ Start Scanning] button to begin scanning.
[Troubleshooting]
| Issue | Check Item |
| Cannot enter scan-ready mode | Check the machine connection status, firmware version, and software version. |
| Scanned image is not clear. | Check the internal LED brightness and the reflectivity of the ring surface. |
| Marking position is incorrect | First check the laser focus. If the marking position is still incorrect, perform camera calibration again. |